
> HEAD BOAT
> MINI ROUND STERN > MESSENGER > STERN CUTAWAY > SHALLOP > DELAWARE > SAILING SKIFF > ROWBOATS > WRIGHT SKIFF > F.D.CROCKETT > PRINCESSKITS FOR NOVICES TOOLS TECHNIQUES MUSEUMS LINKS ABOUT ME
January 10, 2019
A few days ago, I started a new project - a Chesapeake Bay head boat.

I had never heard the term "head boat" when a modeling friend of mine, Web, suggested I build one, so I asked him to describe it. Turns out there are two types of fishing charter boats on the Bay. One is chartered by a small group of 6-8 people for an afternoon of fishing. The charter often includes an onboard meal. These charters run around $1,000 - $1,200 for a morning or afternoon session. That's a bit expensive for some folks, so they turn to the head boats where the rate is about $50-$65 per head. These boats are often larger and can carry upwards of 50 passengers. They tend to be rather boxy in shape, they have a protective canopy, and feature a small pilot house with a closet-sized head immediately behind it. The goal is to leave as much room as possible for the paying guests. Miss Violet, as seen in the picture above, is typical and is my inspiration for this model. I won't be building an exact copy however.This model is being built at 1:16 (3/4"=1') and will be about 30" long.
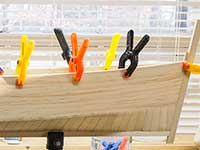
It turned out that I still had the molds and build board for my round-stern workboat, so I decided to re-use those and simply put on a flat stern instead. As you can see below, as of today, I got the chine logs and fist side planks on and then started planking the bottom.
 First Side Plank |
 Bottom Planking |
January 14, 2019
Bottom planking is done and I have a second side plank on each side. The staving went slowly - took a couple of days. I always seem to struggle with the staving but it came out OK in the end. A couple of small holes that will need to be filled where my fitting wasn't perfect. The hull just has a first sanding. I'll wait until I get the rest of the planks on to do the final shaping of the bow and a final sanding.
Next step will be to add the frames so I can put on the remaining side planks.
 Side View |
 Inside Hull |
 Bow Staving |
 Bow Staving |
January 15, 2019
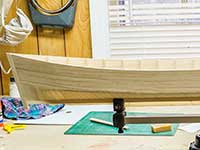
I started on the frames late yesterday afternoon and got them finished up by lunchtime this morning. This afternoon, I got the remaining two planks on each side of the hull. These headboats don't seem to have much of a rise at the bow and the sheer doesn't dip down at midships, so I put one more short plank on each side toward the bow. Tomorrow, I'll decide what the sheer should look like and cut it down.
 Frames |
 Hull Planks |
January 16, 2019
Got the sheer cut down this morning. Spent the afternoon working on the beams and carlins for the deck.
 Sheer |
 Beams and Carlins |
January 21, 2019
Over the past few days, I've gotten the decking down as well as the upper deck beams and washboard supports in place. I also put a foot rail along the outboard side of the deck on each side.
The decking looks a bit wonky, but that is by design - not a result of poor workmanship. All of the real head boats I've looked at have plywood decks, normally in squares although sometimes there is a mix of different sizes. The seams often don't match well, leaving gaps, and they aren't always on perfectly straight. So I wanted to replicate that look. I hope I don't live to regret it since it looks kind of ugly, but it's done now. The pilot house and engine cover as well as the bench seats will cover a good bit of it. When all is dry, I should be ready to paint the inside of the hull.
 Decking |
 Decking |
January 23, 2019
Yesterday, I spent much of the day filling and sanding the hull. I got the outside of the hull primed and the inside painted. Today, I worked on the forward and aft bulkheads since they needed to go on before I could do the upper decking and washboards.
 Forward Bulkhead |
 Aft Bulkhead |
January 27, 2019
I've made some decent progress over the past few days. I got the upper decks and washboards installed and got the toe rails and rub rails on too. Yesterday, I ordered some brass half-round that I intend to put on the outboard edges of the rub rails. I'll either blacken it or put a green patina on it. Haven't decided which yet.
Today, I made the rudder assembly. That won't go one until after I've painted the hull and made and installed the prop. I also did the exhaust pipe. It will get painted, so it was OK to put it on now.
I believe the hull is ready to paint, but I may do a bit of work on the pilothouse first. I haven't really decided exactly what shape and size it will be.
 Hull |
 Hull |
 Exhaust |
 Rudder |
February 1, 2019
I've spent the last several days working on the pilothouse. It has been too cold outside to paint the hull of the boat, but tomorrow is supposed to be warm and sunny, so that will be the next task. After that, I'll start working on the head, which will go behind the pilothouse.
 Pilothouse |
 Pilothouse |
 Pilothouse |
 Pilothouse |
February 6, 2019
I've been busy with the boat the past several days. I mostly have the head done, but I need signage for the outside and my printer is currently out of ink, so that's on hold for another day or two. Meanwhile, I got the hull painted and this morning, I made and installed the prop.
 Prop |
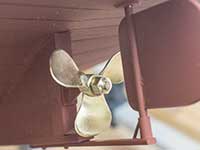 Prop |
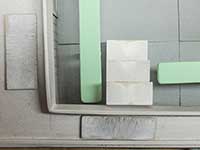
February 8, 2019
I had the head constructed several days ago, but I was waiting on some printer ink to arrive so I could print the signage. That came in today, so I got the head finished.
 Head |
 Head |
February 11, 2019
The bulk of the construction is done now. I have the benches and engine cover made. Started on the canopy yesterday and finished it up this morning. All of the above still need to be painted. None of them are glued in place yet. The canopy will be one of the last things to go on so they interior will be easier to access as I add details. I expect I will work on the anchor yanker next. That's the last major project.
 Canopy |
 Canopy |
February 15, 2019
The anchor yanker is done now. Took me a full three days to do this little project. It seemed like it would be a lot simpler when I started on it but sometimes things just tale longer than you expect.
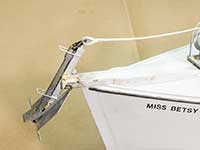 Anchor Yanker |
 Anchor Yanker |
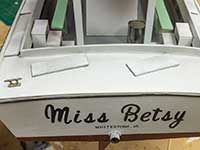
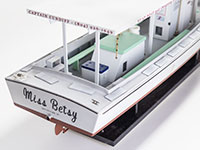
February 16, 2019
This morning, I made the lettering for the canopy. I created the letters in Photoshop, printed them on card stock, and glued them to the canopy. The Miss Betsy on the stern was done last week using stick-on vinyl letters that I got at Michael's. The home port name was done using dry-transfer letters.
This afternoon, I made 6 lights to go under the canopy.
 Canopy Lettering |
 Canopy Lettering |
 Canopy Lights |
 Canopy Light |
February 17, 2019
I didn't get a lot of time in the boatyard today, but I made the steps and the bait-cutting boards.
 Steps and Bait Boards |
 Steps and Bait Boards |
February 21, 2019
Doesn't seem like I've gotten much done in the past few days but a lot of the work has been fiddly and time consuming. Took me all day yesterday to make two fire extinguishers. In the end, I decided to just use one of them. I'll save the other for the next boat. This morning I made the life ring for the front of the pilothouse and also started gluing things down to the deck. This afternoon, I did some experimentation with making a stack of plastic buckets. They are turned from ordinary 1/2" OD PVC plumbing pipe. It turns fairly well but is messy. The chaff is full of static electricity so it clings to everything. The drawback to pipe is that it is hollow, of course, so I'll have to figure out some kind of lid for the top bucket or maybe stick some rags in it. I intend to make another stack or two. Depends on my level of perseverance.
 Life Ring |
 Buckets & Extinguisher |
February 23, 2019
Although I've been calling these life rafts, it turns out the proper term is life floats. Rafts are inflatables and these are solid. In any case, I spent part of yesterday and all of today making them.
 Life Floats |
 Life Floats |
February 24, 2019
Today, I made some cleats for the boat. The fist ones I made seemed too small on the stern, but they looked OK on the bow and outside the pilothouse. Made a couple more larger ones for the stern. I also worked on more plastic buckets. Got another 4 made. Hard on the neck!
 Cleats |
 Cleats |
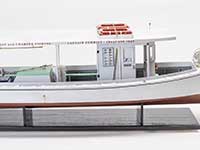
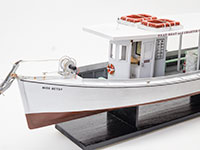
March 1, 2019
Finished the boat last nite! Below are some pics I took this morning. This was a really fun project. My first attempt at weathering a boat and I really enjoyed it.I'm not sure what I'll build next, but a major boatyard cleanup is the first order of business.
 Finished |
 Finished |
 Finished |
 Finished |
 Head |
 Head |
 Boots |
 Boat Hook |
 Prop & Rudder |
 Swab |
 Buckets |
 Rod & Reel |
Copyright © 2021 - John H. Earl
All Rights Reserved.
Problems with the site? Contact the Web Master
Last Updated:
April 3, 2021